# Angular Beers
Some years ago we build a tutorial for Angular JS, AngularBeers, as an alternative to the excellent official AngularJS tutorial. It's time now to actualize the tutorial to Angular.
We teach web-development in an Engineering School with a rather restrictive network. In order to explain Angular to our students, we needed a tutorial that could be played without network access.
So we decided to build a tutorial that could be done even behind a very restrictive proxy. And then we thought about the subject, we decided to keep the same subject that the first one: beers !
# The objectives
# What are the objectives of this tutorial
Follow the tutorial to see how Angular makes browsers smarter — without the use of native extensions or plug-ins:
- See examples of how to use client-side data binding to build dynamic views of data that change immediately in response to user actions.
- See how Angular keeps your views in sync with your data without the need for DOM manipulation.
- Learn how to use dependency injection and services to make common web tasks, such as getting data into your app, easier.
When you finish the tutorial you will be able to:
- Create a dynamic application that works in all modern browsers.
- Use data binding to wire up your data model to your views.
- Move application logic out of the template and into Controllers.
- Get data from a server using Angular services.
The tutorial guides you through the entire process of building a simple application, including writing and running unit and end-to-end tests. Experiments at the end of each step provide suggestions for you to learn more about AngularJS and the application you are building.
You can go through the whole tutorial in a couple of hours or you may want to spend a pleasant day really digging into it. If you're looking for a shorter introduction to Angular, check out the Quickstart.
# What do I need to use this tutorial
Besides a web browser and a text-editor (we suggest the excellent Atom or Visual Studio Code), you will need NodeJS and npm. NodeJS and npm are essential to modern web development with Angular and other platforms. Node powers client development and build tools. The npm package manager, itself a node application, installs JavaScript libraries.
Get them now if they're not already installed on your machine.
Verify that you are running node v10.x.x or higher and npm 6.x.x or higher by running the commands node -v and npm -v in a terminal/console window. Older versions produce errors.
If you have NodeJS in your system, we have put a minimalist JavaScript web-server on ./scripts/web-server.js. To see the app running in a browser, open a separate terminal/command line tab or window, go to the project directory and then run ng serve to start the web server. Now, open a browser window for the app and navigate to http://localhost:4200/ to see the current state of the app.
Now, you just need to clone the project :
git clone https://github.com/Steffy29/angular-beers.git
# How is the tutorial organized
As the computers used for the course haven't Git, we have structured the project to allow a Git-less use. The app directory is the main directory of the project, the working version of the code. The tutorial is divided in steps, each one in its own directory:
- Static Template
- Angular Templates
- Filtering Repeaters and Pipes
- Two-way Data Binding and Pipes
- XHRs & Dependency Injection
- Templating Links & Images
- Routing & Multiple Views
- More Templating
- Event Handlers
- Applying Animations
# Step 01 - Static template
This is the initial step of the tutorial. In this step you won't need to code, everything is already coded for you.
Remember, to see the app running in a browser, open a separate terminal/command line tab or window, go to the project directory and then run node ng serve to start the web server. Now, open a browser window for the app and navigate to http://localhost:4200/ to see the current state of the app.
In order to illustrate how Angular enhances standard HTML, you will create a purely static HTML page and then examine how we can turn this HTML code into a template that Angular will use to dynamically display the same result with any set of data.
In this step you will add some basic information about two beers to an HTML page.
# The structure of the app
As you can see, the app directory have several sub-directories:
beers: a service endpoint with all the information about our beer collection. It will be used in the later steps of the tutorial.css: the stylesheets for the app.app: the AngularJS app files will be here.
What must I do?
Add the beer information to the index.html file:
<ul>
  <li>
    <span>Affligem Blond</span>
    <p>
      Affligem Blonde, the classic clear blonde abbey ale, with a gentle
      roundness and 6.8% alcohol. Low on bitterness, it is eminently drinkable.
    </p>
  </li>
  <li>
    <span>Affligem Tripel</span>
    <p>
      The king of the abbey beers. It is amber-gold and pours with a deep head
      and original aroma, delivering a complex, full bodied flavour. Pure
      enjoyment! Secondary fermentation in the bottle.
    </p>
  </li>
</ul>
Additional experiments
Try adding more static HTML to index.html. For example:
<p>Total number of beers: 2</p>
# Step 02 - Angular Templates
In this step we are going to make the web page dynamic — with Angular.
There are many ways to structure the code for an application.
The objective of this step is to dynamically generate a list of three beers from a block of JSON data.
# Views and templates
In Angular, the view is a projection of the model through the HTML template. This means that whenever the model changes, Angular refreshes the appropriate binding points, which updates the view.
The view component is constructed by Angular from this template :
app/beerList/beerList.html
<ul>
  <li *ngFor="let beer of beers">
    <span>{{beer.name}}</span>
    <p>{{beer.description}}</p>
  </li>
</ul>
In the template we replaced the hard-coded beer list with the NgForOf directive :
- The
*ngFor="let beer of beers"attribute in the<li>tag is an Angular repeater directive. The repeater tells Angular to create a<li>element for each beer in the list using the<li>tag as the template. - The expression wrapped in the curly braces (
beer.nameandbeer.description) will be evaluated and replaced by the value of the expressions.
The Angular expressions in curly braces (beer.name and beer.description) denote bindings, which are referring to our application model, which is set up in our beerList.component component.
# Model and Controller
The data model (a simple array of beers in object literal notation) is now instantiated within the BeerList component.
app/beerlist/beerList.component.ts:
import { Component } from "@angular/core";
@Component({
  selector: "app-beer-list",
  templateUrl: "./beerList.html"
})
export class BeerListComponent {
  beers = [
    {
      alcohol: 8.5,
      name: "Affligem Tripel",
      description:
        "The king of the abbey beers. It is amber-gold and pours with a deep head and original aroma, delivering a complex, full bodied flavour. Pure enjoyment! Secondary fermentation in the bottle."
    },
    {
      alcohol: 9.2,
      name: "Rochefort 8",
      description:
        "A dry but rich flavoured beer with complex fruity and spicy flavours."
    },
    {
      alcohol: 7,
      name: "Chimay Rouge",
      description:
        "This Trappist beer possesses a beautiful coppery colour that makes it particularly attractive. Topped with a creamy head, it gives off a slight fruity apricot smell from the fermentation. The aroma felt in the mouth is a balance confirming the fruit nuances revealed to the sense of smell. This traditional Belgian beer is best savoured at cellar temperature "
    }
  ];
}
# Main module
Our application is loaded by a main module :
app/main.ts:
import { platformBrowserDynamic } from "@angular/platform-browser-dynamic";
import { AppModule } from "./app.module";
platformBrowserDynamic().bootstrapModule(AppModule);
app/app.module.ts:
import { NgModule } from "@angular/core";
import { BrowserModule } from "@angular/platform-browser";
import { BeerListComponent } from "./beerList/beerList.component";
@NgModule({
  imports: [BrowserModule],
  declarations: [BeerListComponent],
  bootstrap: [BeerListComponent]
})
export class AppModule {}
Here we declared a component called BeerList and registered it in an AngularJS module, Main.
Now we can insert our component inside our main page :
index.html:
<body>
    <beer-list>Loading...</beer-list>
</body
Notice that our <beer-list> component (within the <body> tag) now specifies the BeerList component name.
Although the component is not yet doing very much, it plays a crucial role. By providing context for our data model, the component allows us to establish data-binding between the model and the view. We connected the dots between the presentation, data, and logic.
# Experiments
Add another binding to beerList.html. For example:
<p>Total number of beers: {{beers.length}}</p>
Create a new model property in the component and bind to it from the template. For example:
name = "World";
Then add a new binding to beerList.html:
<p>Hello, {{name}}!</p>
Refresh your browser and verify that it says "Hello, World!".
Create a repeater in beerList.html that constructs a simple table:
<table>
  <tr>
    <th>row number</th>
  </tr>
  <tr *ngFor="let i of [0, 1, 2, 3, 4, 5, 6, 7]">
    <td>{{i}}</td>
  </tr>
</table>
Now, make the list 1-based by incrementing i by one in the binding:
<table>
  <tr>
    <th>row number</th>
  </tr>
  <tr *ngFor="let i of [0, 1, 2, 3, 4, 5, 6, 7]">
    <td>{{i+1}}</td>
  </tr>
</table>
Extra points: try and make an 8x8 table using an additional *ngFor.
Summary
You now have a dynamic app that features separate model, view, and controller components. Now, let's go to step 3 to learn how to add full text search to the app.
# Step 03 - Filtering Repeaters and Pipes
We did a lot of work in laying a foundation for the app in the last step, so now we'll do something simple; we will add full text search (yes, it will be simple!).
We want to add a search box to the app, and we want the results on the beer list change according to what the user types into the search box.
In Angular 1 you got filter and orderBy, they do not exist in angular 2 : No FilterPipe or OrderByPipe
### Pipe
Let's create a pipe :
app/pipes/filter-array-pipe.ts
import { Pipe, PipeTransform } from "@angular/core";
// # Filter Array of Objects
@Pipe({ name: "filter" })
export class FilterArrayPipe implements PipeTransform {
  transform(items, args) {
    if (!args || !args[0]) {
      return items;
    } else if (items) {
      return items.filter(item => item.name.match(new RegExp(args, "i")));
    }
  }
}
# Controller
Import the pipe in app/beerlist/beerList.component.ts:
import { Component } from "@angular/core";
import { FilterArrayPipe } from "../pipes/filter-array-pipe";
@Component({
  selector: "beer-list",
  templateUrl: "./beerList.html",
  pipes: [FilterArrayPipe]
})
export class BeerListComponent {
  beers = [
    {
      alcohol: 8.5,
      name: "Affligem Tripel",
      description:
        "The king of the abbey beers. It is amber-gold and pours with a deep head and original aroma, delivering a complex, full bodied flavour. Pure enjoyment! Secondary fermentation in the bottle."
    },
    {
      alcohol: 9.2,
      name: "Rochefort 8",
      description:
        "A dry but rich flavoured beer with complex fruity and spicy flavours."
    },
    {
      alcohol: 7,
      name: "Chimay Rouge",
      description:
        "This Trappist beer possesses a beautiful coppery colour that makes it particularly attractive. Topped with a creamy head, it gives off a slight fruity apricot smell from the fermentation. The aroma felt in the mouth is a balance confirming the fruit nuances revealed to the sense of smell. This traditional Belgian beer is best savoured at cellar temperature "
    }
  ];
}
# Template
We use Twitter Bootstrap column model to divide the page in two columns, the left one for the search box, the right one for the beer list.
We need to add a standard HTML <input> tag and an Angular's pipe to process the input for the NgFor directive directive.
This lets a user enter search criteria and immediately see the effects of their search on the beer list.
In order to use a model on our input, we need to do some imports :
app/app.module.ts :
import { NgModule } from "@angular/core";
import { BrowserModule } from "@angular/platform-browser";
import { FormsModule } from "@angular/forms";
import { BeerListComponent } from "./beerList/beerList.component";
import { FilterArrayPipe } from "./pipes/filter-array-pipe";
@NgModule({
  imports: [BrowserModule, FormsModule],
  declarations: [BeerList, FilterArrayPipe],
  bootstrap: [BeerList]
})
export class AppModule {}
app/beerList/beerList.html:
<div class="container">
  <div class="row">
    <div class="col-md-4">
      <!--Sidebar content-->
      Search: <input [(ngModel)]="query" />
    </div>
    <div class="col-md-8">
      <!--Body content-->
      <ul>
        <li *ngFor="let beer of (beers | filter:query)">
          <span>{{beer.name}}</span>
          <p>{{beer.description}}</p>
        </li>
      </ul>
    </div>
  </div>
</div>
This new code demonstrates the following:
Data-binding: This is one of the core features in Angular. When the page loads, Angular binds the name of the input box to a variable of the same name in the data model and keeps the two in sync.
In this code, the data that a user types into the input box (named
query) is immediately available as a filter input in the list repeater (beer in beers | filter:query). When changes to the data model cause the repeater's input to change, the repeater efficiently updates the DOM to reflect the current state of the model.The
FilterArrayPipepipe uses thequeryvalue to create a new array that contains only those records that match thequery.*ngForautomatically updates the view in response to the changing number of phones returned by thefilterfilter. The process is completely transparent to the developer.
# Experiments
# Display Current Query
Display the current value of the query model by adding a query binding into the app/beerList/beerList.html template, and see how it changes when you type in the input box.
Summary
We have now added full text search! Now let's go on to step 4 to learn how to add sorting capability to the beer app.
# Step 04 - Two-way Data Binding and Pipes
In this step, you will add a feature to let your users control the order of the items in the beer list. The dynamic ordering is implemented by creating a new model property, wiring it together with the repeater, and letting the data binding magic do the rest of the work.
In addition to the search box, the app displays a drop down menu that allows users to control the order in which the beers are listed.
### Pipe
Let's create a pipe :
app/pipes/orderby-pipe.ts
import { Pipe, PipeTransform } from "@angular/core";
@Pipe({ name: "orderby" })
export class OrderByPipe implements PipeTransform {
  transform(array: Array<string>, args: string): Array<string> {
    array.sort((a: any, b: any) => {
      if (a[args] < b[args]) {
        return -1;
      } else if (a[args] > b[args]) {
        return 1;
      } else {
        return 0;
      }
    });
    return array;
  }
}
app/app.module.ts :
import { BrowserModule } from "@angular/platform-browser";
import { NgModule } from "@angular/core";
import { FormsModule } from "@angular/forms";
import { HttpClientModule } from "@angular/common/http";
import { BeerListComponent } from "./beerList/beerList.component";
import { FilterArrayPipe } from "./pipes/filter-array-pipe";
import { OrderByPipe } from "./pipes/orderby-pipe";
@NgModule({
  declarations: [BeerListComponent, FilterArrayPipe, OrderByPipe],
  imports: [BrowserModule, FormsModule, HttpClientModule],
  providers: [],
  bootstrap: [BeerListComponent]
})
export class AppModule {}
# Template
Let's add a selectbox for orderProp and add a pipe orderby
app/beerList/beerList.html:
<div class="container">
  <div class="row">
    <div class="col-md-4">
      <div>Search: <input [(ngModel)]="query" /></div>
      <div>
        Sort by:
        <select [(ngModel)]="orderProp">
          <option value="name">Alphabetical</option>
          <option value="alcohol">Alcohol content</option>
        </select>
      </div>
    </div>
    <div class="col-md-8">
      <!--Body content-->
      <ul>
        <li *ngFor="let beer of (beers | filter:query | orderby:orderProp)">
          <span
            >{{beer.name}}
            <span class="tag tag-default">{{beer.alcohol}} °</span></span
          >
          <p>{{beer.description}}</p>
        </li>
      </ul>
    </div>
  </div>
</div>
# Controller
We modify the beers model - the array of beers - and added an alcohol property to each beer record. This property is used to order beers by their alcohol content.
Then we add a line to the controller that sets the default value of orderProp to alcohol. If we had not set a default value here, the orderby pipe would remain uninitialized until our user picked an option from the drop down menu.
Import the pipe in app/beerlist/beerList.component.ts:
import { Component } from "@angular/core";
import { FilterArrayPipe } from "../pipes/filter-array-pipe";
import { OrderByPipe } from "../pipes/orderby-pipe";
@Component({
  selector: "beer-list",
  templateUrl: "./app/beerlist/beerList.html",
  providers: [FilterArrayPipe, OrderByPipe]
})
export class BeerList {
  orderProp = "alcohol";
  beers = [
    {
      alcohol: 6.8,
      name: "Affligem Blond",
      description:
        "Affligem Blonde, the classic clear blonde abbey ale, with a gentle roundness and 6.8% alcohol. Low on bitterness, it is eminently drinkable."
    },
    {
      alcohol: 8.5,
      name: "Affligem Tripel",
      description:
        "The king of the abbey beers. It is amber-gold and pours with a deep head and original aroma, delivering a complex, full bodied flavour. Pure enjoyment! Secondary fermentation in the bottle."
    },
    {
      alcohol: 9.2,
      name: "Rochefort 8",
      description:
        "A dry but rich flavoured beer with complex fruity and spicy flavours."
    },
    {
      alcohol: 11.3,
      name: "Rochefort 10",
      description:
        "The top product from the Rochefort Trappist brewery. Dark colour, full and very impressive taste. Strong plum, raisin, and black currant palate, with ascending notes of vinousness and other complexities."
    },
    {
      alcohol: 7,
      name: "Chimay Rouge",
      description:
        "This Trappist beer possesses a beautiful coppery colour that makes it particularly attractive. Topped with a creamy head, it gives off a slight fruity apricot smell from the fermentation. The aroma felt in the mouth is a balance confirming the fruit nuances revealed to the sense of smell. This traditional Belgian beer is best savoured at cellar temperature "
    }
  ];
}
This is a good time to talk about two-way data-binding. Notice that when the app is loaded in the browser, "Alcohol content" is selected in the drop down menu. This is because we set orderProp to alcohol in the controller. So the binding works in the direction from our model to the UI. Now if you select "Alphabetically" in the drop down menu, the model will be updated as well and the beers will be reordered. That is the data-binding doing its job in the opposite direction — from the UI to the model.
# Experiments
In the beerList.component controller, remove the statement that sets the orderProp value and you'll see that Angular will temporarily add a new "unknown" option to the drop-down list and the ordering will default to unordered/natural order.
Add an orderProp binding into the beerList.html template to display its current value as text.
Let's experiment with some of the built-in Angular pipes and add the following bindings to beerList.html:
{{ "lower cap string" | uppercase }} {{ {foo: "bar", baz: 23} | json }} {{
1304375948024 | date }} {{ 1304375948024 | date:"MM/dd/yyyy @ h:mma" }}
Summary
Now that you have added list sorting, go to step 5 to learn about Angular services and how Angular uses dependency injection.
# Step 05 - XHRs & Dependency Injection
Enough of building an app with five beers in a hard-coded dataset! Let's fetch a larger dataset from our server using one of Angular's built-in services called HttpClientModule. We will use Angular's dependency injection (DI) to provide the service to the beerList.component controller.
# Data
Our new dataset is now a list of 11 beers stored in JSON format in the beers/beers.json file in your project.
This file is available from the server at the URL http://127.0.0.1:4200/beers/beers.json
beers/beers.json:
[
  ...
  {
    "alcohol": 6.8,
    "description": "A reddish-brown abbey ale brewed with dark malts. The secondary fermentation gives a fruity aroma and a unique spicy character with a distinctive aftertaste. Secondary fermentation in the bottle.",
    "id": "AffligemDubbel",
    "img": "beers/img/AffligemDubbel.jpg",
    "name": "Affligem Dubbel"
  },
  ...
]
# Controller
The file beers/beers.json need to be load into the application. First, it's necessary to import the node configuration with the command npm i @types/node.
tsconfig.app.json :
{
  "extends": "../tsconfig.json",
  "compilerOptions": {
    "outDir": "../out-tsc/app",
    "types": [
      "node"
    ]
  },
  "exclude": [
    "test.ts",
    "**/*.spec.ts"
  ]
}
app/app.module.ts :
import {NgModule} from '@angular/core';
import {BrowserModule} from '@angular/platform-browser';
import {FormsModule} from '@angular/forms';
import { HttpClientModule, JsonpClientBackend }  from '@angular/common/http';
import {BeerList} from './beerList/beerList.component';
import {FilterArrayPipe} from './pipes/filter-array-pipe';
import {OrderByPipe} from './pipes/orderby-pipe';
@NgModule({
    imports: [
        BrowserModule,
        FormsModule,
        JsonpClientBackend,
        HttpClientModule
    ],
    declarations: [
        BeerList,
        FilterArrayPipe,
        OrderByPipe
    ],
    bootstrap: [BeerList]
})
export class AppModule {
}
Create interface for beer description
app/beer.interface.ts :
export interface Beer {
    alcohol: string,
    description: string,
    id: string,
    img: string,
    name: string,
}
app/beers.service.ts :
import { Injectable } from '@angular/core';
import { HttpClient } from '@angular/common/http';
import { Observable } from 'rxjs';
import { Beer } from './beerList/beer.interface';
@Injectable()
export class BeerService {
    // URL to web API
    beersUrl = 'assets/beers/beers.json';
    constructor(private httpClient : HttpClient) {
    }
    getBeers(): Observable<any> {
        return this.httpClient.get<Beer>(this.beersUrl);
    }
}
app/beerlist/beerList.component.ts :
import {Component} from '@angular/core';
import {FilterArrayPipe} from '../pipes/filter-array-pipe';
import {OrderByPipe} from '../pipes/orderby-pipe';
import { BeerService } from '../beers.service';
@Component({
 selector: 'beer-list',
 templateUrl: './app/beerlist/beerList.html',
 providers: [FilterArrayPipe, OrderByPipe, BeerService]
})
export class BeerList {
 orderProp = 'alcohol';
 beers = [];
 mode = 'Promise';
 constructor (private beerService: BeerService) {}
 ngOnInit() { this.getBeers(); }
  getBeers() {
    this.beerService.getBeers().subscribe(data => {
        this.beers = data
    });
  }
}
Angular's dependency injector provides services to your controller when the controller is being constructed. The dependency injector also takes care of creating any transitive dependencies the service may have (services often depend upon other services).
Summary
Now that you have learned how easy it is to use Angular services (thanks to Angular's dependency injection), go to step 6, where you will add some thumbnail images of beers and some links.
# Step 06 - Templating Links & Images
In this step, you will add thumbnail images for the beers in the beer list, and links that, for now, will go nowhere. In subsequent steps you will use the links to display additional information about the beers in the catalog.
So the objective is to add links and images of the beers in the list.
# Data
Note that the beers.json file contains unique ids and image urls for each of the beers. The urls point to the assets/img directory.
app/beers/beers.json:
[
  ...
  {
    "alcohol": 6.8,
    "description": "A reddish-brown abbey ale brewed with dark malts. The secondary fermentation gives a fruity aroma and a unique spicy character with a distinctive aftertaste. Secondary fermentation in the bottle.",
    "id": "AffligemDubbel",
    "img": "assets/img/AffligemDubbel.jpg",
    "name": "Affligem Dubbel"
  },
  ...
]
# Template
Copy the directory assets/img into src/assets to have access to images into page.
To dynamically generate links that will in the future lead to beer detail pages, we used the now-familiar double-curly brace binding in the href attribute values. In step 2, we added the beer.name binding as the element content. In this step the beer.id binding is used in the element attribute.
We also added beer images next to each record using an img tag with the [src] directive. That directive prevents the browser from treating the Angular expression markup literally, and initiating a request to invalid url http://localhost:4200/app/:beer.img, which it would have done if we had only specified an attribute binding in a regular src attribute . Using the [src] directive prevents the browser from making an http request to an invalid location.
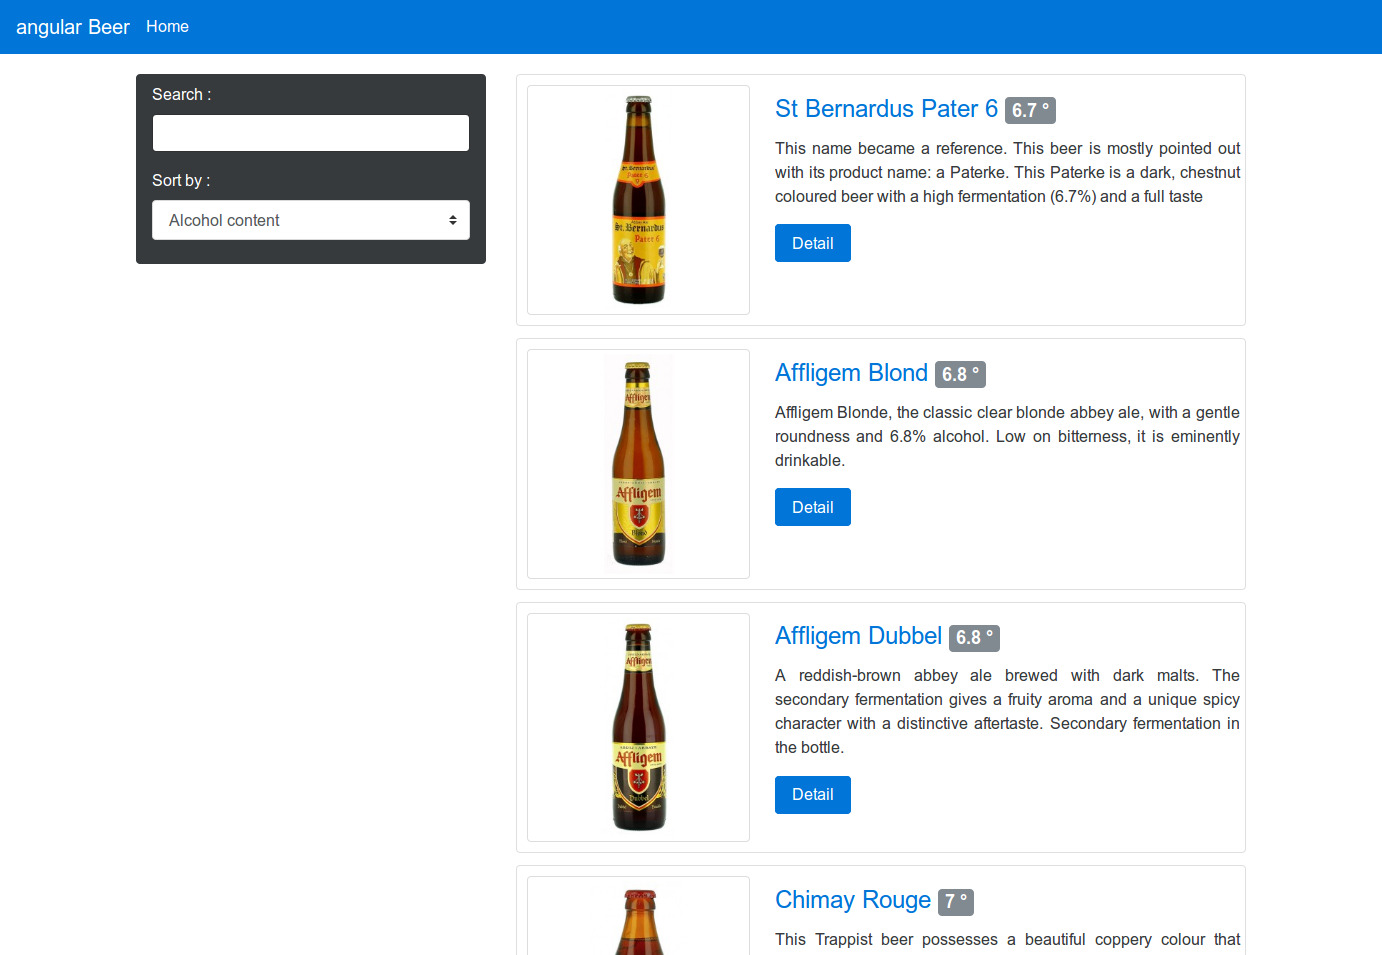
app/beerList/beerList.html:
<div
  class="card"
  *ngFor="let beer of (beers | filter:query | orderby:orderProp)"
>
  <div class="row">
    <a href="#/beers/{{beer.id}}" class="col-sm-4 thumb">
      <img class="img-thumbnail" [src]="beer.img" alt="Beer image" />
    </a>
    <div class="col-sm-8 card-block">
      <a href="#/beers/{{beer.id}}"
        ><h4 class="card-title">
          {{beer.name}} <span class="tag tag-default">{{beer.alcohol}} °</span>
        </h4></a
      >
      <p class="card-text">{{beer.description}}</p>
      <a href="#/beers/{{beer.id}}" class="btn btn-primary">Detail</a>
    </div>
  </div>
</div>
# Experiments
Add style to the display with Bootstrap.
First install dependencies npm install bootstrap font-awesome.
Adding link to the angular.json file.
"styles": [
    "src/styles.css",
    "node_modules/bootstrap/dist/css/bootstrap.min.css"
],
Adding import into src/styles.css
@import "~bootstrap/dist/css/bootstrap.css";
@import "~font-awesome/css/font-awesome.css";
Summary
Now that you have added beer images and links, go to step 7 to learn about Angular layout templates and how Angular makes it easy to create applications that have multiple views.
# Step 07 - Routing & Multiple Views
In this step, you will learn how to create a layout template and how to build an app that has multiple views by adding routing, using an Angular module called 'RouterModule'.
When you now navigate to
app/index.html, you are redirected toapp/index.html/#/beersand the beer list appears in the browser.When you click on a beer link the url changes to one specific to that beer and the stub of a beer detail page is displayed.
# Dependencies
The routing functionality added by this step is provided by angular in the RouterModule module.
# Multiple Views, Routing and Layout Template
Our app is slowly growing and becoming more complex. Before step 7, the app provided our users with a single view (the list of all beers), and all of the template code was located in the index.html file. The next step in building the app is to add a view that will show detailed information about each of the beers in our list.
To add the detailed view, we could expand the index.html file to contain template code for both views, but that would get messy very quickly. Instead, we are going to turn the index.html template into what we call a "layout template". This is a template that is common for all views in our application. Other "partial templates" are then included into this layout template depending on the current "route" — the view that is currently displayed to the user.
Application routes in Angular are declared via the Routes. This service makes it easy to wire together controllers, view templates, and the current URL location in the browser. Using this feature we can implement deep linking, which lets us utilize the browser's history (back and forward navigation) and bookmarks.
### The router
First modify app/index.html by adding <base href="./#"/> within the head tag.
Then modify the body into app/index.html :
<body>
    <div class="main">
        <my-app>
            <div class="container">Loading...
                <progress class="progress progress-striped progress-animated" value="100" max="100"></progress>
            </div>
        </my-app>
    </div>
</body>
Then, we will build a root component :
app/app.component.ts :
import { Component } from "@angular/core";
@Component({
  selector: "my-app",
  template: "<router-outlet></router-outlet>"
})
export class AppComponent {}
You can notice the special <router-outlet> tag.
Then import this component in app/app.module.ts :
[...]
import {AppComponent} from './app.component';
import { routing } from "./app.routing";
[...]
    declarations: [
        AppComponent,
        BeerList,
        BeerDetail,
        FilterArrayPipe,
        OrderByPipe
    ],
    imports: [
        BrowserModule,
        FormsModule,
        HttpClientModule,
        HttpClientJsonpModule,
        routing
    ],
    bootstrap: [AppComponent]
})
export class AppModule {
}
Then let's code our router in app/app.routing.ts :
import { ModuleWithProviders } from "@angular/core";
import { Routes, RouterModule } from "@angular/router";
import { BeerListComponent } from "./beerList/beerList.component";
import { BeerDetailComponent } from "./beerDetail/beerDetail.component";
const appRoutes: Routes = [
  {
    path: "",
    redirectTo: "/beers",
    pathMatch: "full"
  },
  {
    path: "beers",
    component: BeerListComponent
  },
  {
    path: "beers/:id",
    component: BeerDetailComponent
  }
];
export const routing: ModuleWithProviders = RouterModule.forRoot(appRoutes, {
  useHash: true
});
Our application routes are defined as follows:
when('/beers'): The beer list view will be shown when the URL hash fragment is/beers. To construct this view, Angular will use thebeerList.htmltemplate and the BeerList controller.when('/beers/:beerId'): The beer details view will be shown when the URL hash fragment matches'/beers/:beerId', where:beerIdis a variable part of the URL. To construct the beer details view, Angular will use thebeerDetail.htmltemplate and theBeerDetailcontroller.otherwise({redirectTo: '/beers'}): triggers a redirection to/beerswhen the browser address doesn't match either of our routes.
We reused the BeerList controller that we constructed in previous steps and we added a new, empty BeerDetail controller for the beer details view.
Note the use of the :beerId parameter in the second route declaration. The Route service uses the route declaration — '/beers/:beerId' — as a template that is matched against the current URL. All variables defined with the : notation are extracted into the Params object.
In fact, depending of the path, through the <router-outlet> tag, we display the list or the detail. In the previous step, we use :
<a href="#/beers/{{beer.id}}" class="btn btn-primary">Detail</a>
, notice the "#" before th path, you can work without but with the HTML5 compliance level (see).
We also added a placeholder template for the beer details view:
app/beerdetail/beerDetail.html :
<div class="container">
    TBD: detail view for <span>{{beerId}}</span>
</div>
Note how we are using the beerId expression which will be defined in the BeerDetail controller.
# Controllers
app/beerdetail/beerDetail.component.ts :
import { Component, OnInit } from "@angular/core";
import { ActivatedRoute, Params } from "@angular/router";
import { Location } from "@angular/common";
@Component({
  selector: "beer-detail",
  templateUrl: "./beerDetail.html"
})
export class BeerDetailComponent implements OnInit {
  beer = {};
  beerId = 0;
  constructor(private route: ActivatedRoute) {}
  ngOnInit(): void {
    this.route.params.forEach((params: Params) => {
      this.beerId = params["id"];
    });
  }
}
Again, note that we created a module called AppModule in app/app.module.ts. For small AngularJS applications, it's common to create just one module for all of your components if the
re are just a few. As your application grows it is quite common to refactor your code into additional modules. For larger apps, you will probably want to create separate modules for each major feature of your app.
Because our example app is relatively small, we'll just add all of our components to the AppModule module.
Summary
With the routing set up and the beer list view implemented, we're ready to go to step 8 to implement the beer details view.
# Step 08 - More Templating
In this step, you will implement the beer details view, which is displayed when a user clicks on a beer in the beer list.
When you click on a beer on the list, the beer details page with beer-specific information is displayed.
To implement the beer details view we used HttpClientModule to fetch our data, and we fleshed out the beerDetail.html view template.
# Data
In addition to beers.json, the app/beers/ directory also contains one JSON file for each beer:
app/beers/TrappistesRochefort8.json: (sample)
{
  "alcohol": 9.2,
  "availability": "Year round",
  "brewery": "Rochefort Brewery (Brasserie de Rochefort)",
  "description": "A dry but rich flavoured beer with complex fruity and spicy flavours.",
  "id": "TrappistesRochefort8",
  "img": "beers/img/TrappistesRochefort8.jpg",
  "label": "beers/img/TrappistesRochefort8-label.png",
  "name": "Rochefort 8",
  "serving": "Serve in a Snifter",
  "style": "Trappiste"
}
Each of these files describes various properties of the beer using the same data structure. We'll show this data in the beer detail view.
# Controller
We'll enhance the BeerService by using the HttpClient service to fetch the JSON files. This works the same way as the beer list controller.
app/beers.service.ts:
    getBeer(beerId: String): Observable<any> {
        return this.httpClient.get<Beer>('assets/beers/' + beerId + '.json');
    }
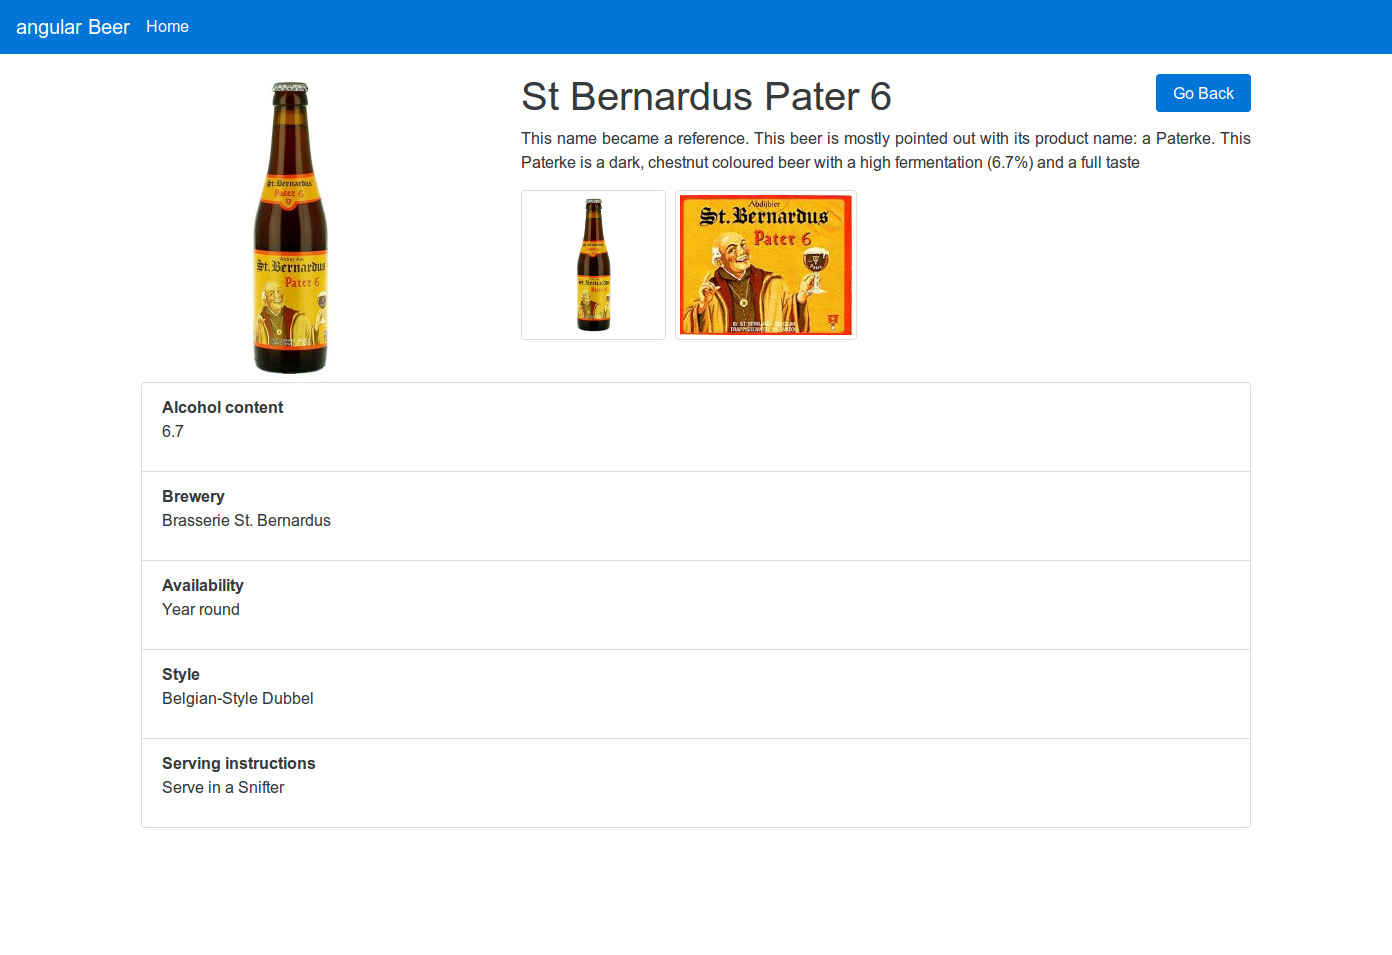
# Template
The TBD placeholder line has been replaced with lists and bindings that comprise the beer details.
Note where we use the Angular expression markup to project beer data from our model into the view.
app/beerdetail/beerDetail.html:
<div class="container">
    <div class="row">
        <div class="col-md-4"><img [src]="beer.img" class="beer"></div>
        <div class="col-md-8">
            <h1>{{beer.name}}</h1>
            <p class="text-justify">{{beer.description}}</p>
            <ul class="list-inline">
                <li class="list-inline-item">
                    <img [src]="beer.img" class="img-thumbnail thumb">
                </li>
                <li class="list-inline-item">
                    <img [src]="beer.label" class="img-thumbnail thumb">
                </li>
            </ul>
        </div>
    </div>
    <ul class="list-group">
        <li class="list-group-item"><dl><dt>Alcohol content</dt><dd>{{beer.alcohol}}</dd></dl></li>
        <li class="list-group-item"><dl><dt>Brewery</dt><dd>{{beer.brewery}}</dd></dl></li>
        <li class="list-group-item"><dl><dt>Availability</dt><dd>{{beer.availability}}</dd></dl></li>
        <li class="list-group-item"><dl><dt>Style</dt><dd>{{beer.style}}</dd></dl></li>
        <li class="list-group-item"><dl><dt>Serving instructions</dt><dd>{{beer.serving}}</dd></dl></li>
    </ul>
</div>
Summary
Now that the phone details view is in place, proceed to step 09 to learn how to write your own custom display filter.
# Step 09 - Event Handlers
In this step, you will add a clickable beer image swapper to the beer details page.
The beer details view displays one large image of the current beer and several smaller thumbnail images. It would be great if we could replace the large image with any of the thumbnails just by clicking on the desired thumbnail image. Let's have a look at how we can do this with Angular.
# Controller
In the BeerDetail controller, we created the mainImg model property and set its default value to the beer's bottle image URL.
We also created a setImage event handler function that will change the value of mainImg
app/beerdetail/beerDetail.component.ts:
  getBeer(beerId: string) {
    this.beerService.getBeer(beerId).subscribe(beer => {
      this.beer = beer;
      this.setImage(beer.img);
    });
  }
  setImage(img: string) {
    this.mainImg = `assets/${img}`;
    console.log(this.mainImg);
  }
# Template
We bound the [src] directive of the large image to the mainImg property.
We also registered an Click handler with thumbnail images. When a user clicks on one of the thumbnail images, the handler will use the setImage event handler function to change the value of the mainImg property to the URL of the thumbnail image.
app/beerdetail/beerDetail.html:
<div class="row">
    <div class="col-md-4"><img [src]="mainImg" class="beer"></div>
    <div class="col-md-8">
        <h1>{{beer.name}}</h1>
        <p class="text-justify">{{beer.description}}</p>
        <ul class="list-inline">
            <li class="list-inline-item">
                <img [src]="beer.img" class="img-thumbnail thumb" (click)="setImage(beer.img)">
            </li>
            <li class="list-inline-item">
                <img [src]="beer.label" class="img-thumbnail thumb" (click)="setImage(beer.label)">
            </li>
        </ul>
    </div>
</div>
Summary
With the beer image swapper in place, we're ready for step 10 to learn an even better way to fetch data.
# Step 10 - Applying Animations
In this final step, we will enhance our Angular Beer web application by attaching CSS and JavaScript animations on top of the template code we created before.
# Dependencies
You can build a simple animation that transitions an element between two states driven by a model attribute.
Animations are defined inside @Component metadata. Before you can add animations, you need to import a few animation-specific functions:
app.module.ts
[...]
import { BrowserAnimationsModule } from "@angular/platform-browser/animations";
[...]
@NgModule({
  declarations: [
    AppComponent,
    FilterArrayPipe,
    OrderByPipe,
    BeerListComponent,
    BeerDetailComponent
  ],
  imports: [
    BrowserModule,
    BrowserAnimationsModule,
    FormsModule,
    HttpClientModule,
    HttpClientJsonpModule,
    routing
  ],
[...]
app/beerdetail/beerDetail.component.ts
import {Component, OnInit} from '@angular/core';
import {ActivatedRoute, Params} from '@angular/router';
import { trigger, state, style, transition, animate } from "@angular/animations";
import {BeerService} from '../beers.service';
@Component({
    selector: 'beer-detail',
    templateUrl: './app/beerdetail/beerDetail.html',
    providers: [BeerService],
    animations: [
        trigger('beerState', [
            state('inactive', style({
                backgroundColor: '#fff',
                transform: 'scale(1)'
            })),
            state('active',   style({
                backgroundColor: '#0275d8',
                transform: 'scale(1.1)'
            })),
            transition('inactive => active', animate('100ms ease-in')),
            transition('active => inactive', animate('100ms ease-out'))
        ])
    ]
})
export class BeerDetail implements OnInit {
    beer = {};
    mainImg;
    state = {
        img : 'inactive',
        label: 'inactive'
    };
    constructor(private route: ActivatedRoute,
                private beerService: BeerService) {
    }
    ngOnInit(): void {
        this.route.params.forEach((params: Params) => {
            this.getBeer(params['id']);
        });
    }
  getBeer(beerId: string) {
    this.beerService.getBeer(beerId).subscribe(beer => {
      this.beer = beer;
      this.setImage('img');
    });
  }
  setImage(obj: string) {
    this.mainImg = `assets/${this.beer[obj]}`;
    if (obj === 'img') {
      this.state.img = 'active';
      this.state.label = 'inactive';
    } else {
      this.state.img = 'inactive';
      this.state.label = 'active';
    }
  }
}
# Template
Here's what needs to be changed in the file:
app/beerdetail/beerDetail.html:
[...]
<ul class="list-inline">
    <li class="list-inline-item">
        <img [src]="beer.img" class="img-thumbnail thumb" (click)="setImage('img')"
             [@beerState]="state.img"
        >
    </li>
    <li class="list-inline-item">
        <img [src]="beer.label" class="img-thumbnail thumb" (click)="setImage('label')"
             [@beerState]="state.label"
        >
    </li>
</ul>
[...]
# Experiments
More fun, add a fly effect when we enter the detail page :
[...]
<img [src]="mainImg" [@flyInOut]="'in'" class="beer">
[...]
trigger('flyInOut', [
    state('in', style({transform: 'translateX(0)'})),
    transition('void => *', [
        style({transform: 'translateX(-100%)'}),
        animate(100)
    ])
])
And why not when we navigate ?
On each component declared in the Router (ie : in app/beerlist/beerList.component.ts):
import { Component, OnInit } from "@angular/core";
import { trigger, state, style, transition, animate } from "@angular/animations";
[...]
@Component({
    selector: 'beer-list',
    templateUrl: './app/beerlist/beerList.html',
    pipes: [FilterArrayPipe, OrderByPipe],
    host: {
        '[@routeAnimation]': 'true',
        '[style.display]': "'block'",
        '[style.position]': "'absolute'"
    },
    animations: [
        trigger('routeAnimation', [
            state('*', style({transform: 'translateX(0)', opacity: 1})),
            transition('void => *', [
                style({transform: 'translateX(-100%)', opacity: 0}),
                animate(1000)
            ]),
            transition('* => void', animate(1000, style({transform: 'translateX(100%)', opacity: 0})))
        ]),
    ],
    providers: [BeerService]
})
[...]
# Summary
There you have it! We have created a web app in a relatively short amount of time. Brace yourselves.